TRAP/J 2.1 Manual
Generator Interface
This page explains the controls available in the Generator Interface.
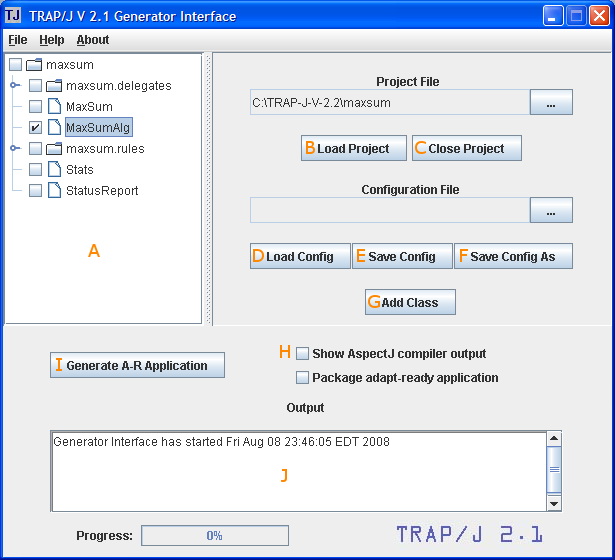
- Application View - displays your application as a hierarchy of packages and classes. Initially,
only the contents of the root package are displayed. To view child packages and their classes, expand
each package by clicking the icon to the left of each package's checkbox.
- Load Project Button - opens a folder browser so that you can select the project
for which to generate an Adapt-Ready application. Once you've found your project folder, click the "Open"
button in the folder dialog and your project will be displayed in the Application View.
- Close Project Button - closes your project and removes it from the Application View.
- Load Config Button- allows you to load a previously saved configuration file. This button
is only enabled once you've loaded a project.
- Save Config Button - saves your current configuration to the configuration file you're currently
using. This button is only enabled once you've loaded a project.
- Save Config As Button - saves to a configuration file the names of all the classes you've selected
to make Adapt-Ready so that performing the same generation in the future will be faster.
This button is only enabled once you've loaded a project.
- Add Class Button - allows you to include Adapt-Ready versions of classes from the standard Java
class library in your Adapt-Ready Application. When you click this button, you will be prompted for the fully qualified name
of the class you want to include. You may only specify classes which can be extended, such as java.net.MulticastSocket, and not
classes which have been declared final, such as java.lang.String.
- Show AspectJ compiler output Checkbox - if checked, shows the output from the AspectJ compiler during generation.
- Generate A-R Application Button - generates the Adapt-Ready Application. You can find
the generated files in the folder edu/fiu/cis/acrl/reflect/generated relative to the TRAP/J folder.
- Output Console - displays status messages and the outcomes of operations.